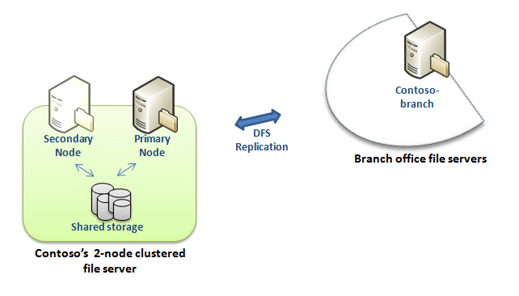
Converting a traditional file server to Distributed File System (DFS) involves several steps. DFS allows you to organize file shares across multiple servers into a unified namespace, providing fault tolerance, load balancing, and simplified access to files.
Step 1: Plan Your DFS Namespace
- Identify servers: Decide which servers will host your DFS namespace.
- Plan namespace structure: Determine the structure of your DFS namespace, including folder names and hierarchy.
- Choose replication or standalone: Decide whether you’ll use DFS Replication (DFSR) for redundancy or simply create standalone namespaces.
Step 2: Install DFS Role
- Open Server Manager.
- Click on “Add roles and features.”
- Select “Role-based or feature-based installation” and click “Next.”
- Choose the server where you want to install the DFS role.
- Select “File and Storage Services” and then “File and iSCSI Services.”
- Check “DFS Namespaces” and/or “DFS Replication” depending on your needs.
- Complete the installation process by following the wizard.
Step 3: Configure DFS Namespace
- Open DFS Management console.
- Right-click on “Namespaces” and choose “New Namespace.”
- Follow the wizard to create the namespace, specifying its name and server(s) hosting it.
- Once created, right-click on the namespace and select “New Folder” to create folders within the namespace according to your planned structure.
Step 4: Add Folder Targets
- Right-click on the folder within your DFS namespace and select “Add Folder Target.”
- Specify the path of the folder on the existing file server that you want to include in the namespace.
- Repeat this process for each folder you want to include in the namespace, regardless of whether they’re on the same server or different servers.
Step 5: Configure DFS Replication (Optional)
- If you’re using DFS Replication for redundancy, navigate to the “Replication” tab in DFS Management.
- Right-click on “Replication” and select “New Replication Group.”
- Follow the wizard to set up replication groups, specifying replication group name, replication topology, and replication group members.
Step 6: Test and Verify
- Access the DFS namespace from client machines to ensure that it’s accessible.
- Create, modify, and delete files to ensure that changes are replicated (if using DFSR) and accessible across servers.
- Monitor DFS Management console for any warnings or errors, addressing them as needed.
Step 7: Document and Train
- Document the new DFS setup, including namespace structure, replication settings (if applicable), and any other relevant information.
- Train relevant staff on how to access and manage files through the new DFS namespace.
Note: Ensure you have backups in place before making any significant changes to your file server infrastructure.


Leave a Reply